How to Make Coffee in a Percolator: In 6 Easy Steps

Table of Contents
ToggleCoffee can be brewed using a range of different methods. From the humble, straightforward french press to the most high-tech and precise espresso machines, coffee lovers are well-catered to regardless of how much effort they want to put in.
One of the most rudimentary coffee brewing devices is the percolator. It was particularly popular in the 1970s but has since been eclipsed by modern bean-to-cup coffee machines and pod machines. However, whilst some hardcore coffee enthusiasts like going back to their roots by using the humble percolator, many have sighted its bitter produce as a reason for it to fall out of favor. This may be a reason why we now see moka pots replacing percolators a lot more nowadays.
Coffee is made in a percolator from water being heated through the bottom of the percolator, which then rises through a thin chamber to the top of the device. This water proceeds to overflow and drip through a filter basket containing coarsely ground coffee beans. The process of the water seeping through the coffee grounds is known as ‘percolation’, and this is repeated multiple times to give the coffee a deeper flavor.
But, if you still want to know how to make coffee in a percolator, then you’ve come to the right place!

What is a Coffee Percolator and How Does it Work?
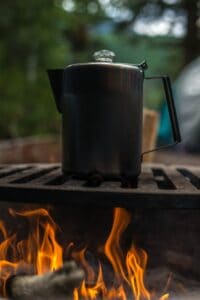
There are two main types of coffee percolators, manual and electric. A manual percolator is a very simple device that is effectively a kettle powered by stovetop heat. This drives hot water through a small funnel, up towards the top of the kettle, which then drips down through a small mesh basket, holding your ground coffee.
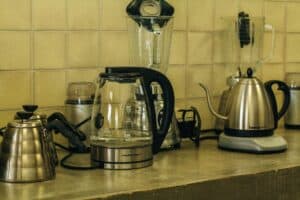
Whereas, an electric percolator heats its water using a timed heating element at the bottom of the device, much like a regular electric kettle. Electric percolators also tend to have a ‘keep warm mode’ which ensures the coffee stays at the right temperature without being over-brewed.
The traditional stovetop percolator tends to be cheaper to buy, but it is also more difficult to control the brewing process. The heat from the stove needs to be kept at exactly the right temperature to ensure there is enough heat in the percolator to get the process going, but not so much that the coffee burns and becomes bitter.
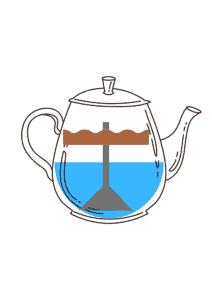
As you can see by the very rudimentary image below, regardless of whether the percolator in question is a manual stovetop version or an electric one, the percolation process remains the same. Water is added to the bottom chamber (as shown by the blue shaded area below), which is then heated up. The hot water then travels up the grey funnel and drips down into the brown chamber, which is filled with ground coffee.

Percolator vs Moka Pot

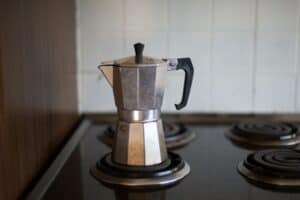
On the face of it, moka pots and percolators look pretty similar. They are both usually placed on the stovetop for heating, but in reality, they are actually very different methods of brewing coffee.
Where a percolator uses the process of percolation to effectively create a continuous drip brew, a moka pot uses pressure to almost explode the hot water through the coffee grounds and into the upper chamber of the device!
You can think of a coffee percolator as a ‘sit back and leave it’ brewing process. 5-10 minutes later and you will have strong coffee, brewed continuously and repeatedly through the percolation process. Whilst it looks similar on the outside, a moka pot is a little more difficult to control, as there is actually only quite a narrow window for it to produce perfect coffee.
The coffee in your moka pot will be ready when you can hear the water boiling. Be quick though, as leaving it for too long can over brew your coffee and leave it tasting bitter! In fact, as little as a few seconds of extra brewing can render your coffee unpalatable.
To see what I mean, check out this cool video by TarantuloTV showing an X-ray of the moka pot brewing process:
Most moka pots are smaller in dimensions than most coffee percolators, so you won’t actually be filling the lower chamber up with that much water. As a result, the coffee won’t actually take very long to brew. Moka pot coffee is produced in a similar way to traditional espresso, but simply at a much lower level of pressure. This results in a rich, bold flavor, minus the crema.
Whereas, a percolator coffee drips back down onto itself and is more similar to the classic ‘drip brew’ method. This results in a full-bodied but more refined flavor.
Both moka pots and percolators make great alternatives for brewing espresso when you don’t have an espresso machine to hand.
How to Make Coffee Using a Percolator
Here is a step guide to help you brew the perfect cup of coffee using a percolator.
1. Grind Your Coffee:
Your best bet is to use freshly ground, coarse coffee for a percolator. Just like a french press, this is because there is no filter present in this method. I recommend using around 1 tablespoon of ground coffee per cup of water you add to the lower chamber of your percolator.
I would recommend using a medium or even subtly flavored light-roasted coffee for this method. Remember that your coffee will be brewed repeatedly, so this will intensify the flavor. Therefore, using a dark roast in a percolator will simply produce bitter and unpleasantly strong coffee.
2. Remove the Lid from Your Percolator and Add Cold Water and Coffee:
The next step in the process is to set up your percolator. The steps are similar regardless of whether you are using a manual stove top, or an electric device.
Firstly remove the glass-topped lid, basket, and central tube. This will give you more room to add your water to the bottom of the device (percolator reservoir).
Then, add your basket and tube back to the middle of the device, along with your desired quantity of ground coffee.
Add the lid back to the percolator and you’re good to go!
3. Apply Heat
Stove Tops Percolators
If you are using a stovetop percolator, place it on top of a small hob ring (regardless of whether your hob is electric or gas). This will give you more control over the application of heat. You want to start off on low heat to get the water bubbling, but it should not be so hot that it is boiling.
Keep an eye on the transparent lid top (something that sets a percolator apart from other kettles), just to make sure the water is bubbling slowly. It may take a couple of minutes to get your water up to temperature, but once it is, adjust the heat to maintain a consistent temperature.
A key tip here is to add heat gradually, as the last thing you want is to burn the coffee or give it a bitter taste. If you see your water bubbling too much, it will be too hot and you can simply remove the percolator from the heat briefly to bring the temperature down. Lower the heat on your hob ring slightly and add the device back to the heat.
Electric Percolators
If you are using an electric percolator, the process is a lot more straightforward. You just need to plug the device into an electric socket and wait. The majority of electric percolators have an on the switch and a start button, so flick both of these if yours does.
Some devices will start the brewing process automatically, so it’s worth staying with your percolator for a minute or two after plugging it in, just to make sure that everything is going to plan.
The percolator will automatically turn off the heat when the brewing process is complete, which will usually take anywhere between 5 and 10 minutes depending on your make and model.
4. Sit Back and Wait
Of course, you should keep an eye on your percolator, you are using a stovetop after all! But, if you have set up the heat correctly, you should be able to do the dishes or at least reach for the biscuit tin whilst your percolator coffee bubbles away!
Once the percolator is up to temperature, you’ll see the water spurting up every few seconds and hit the glass lid top. I recommend using a glass-topped percolator by the way, as you don’t want a plastic taste ruining your brew!
Where an electric percolator will have a light that goes off (you will also know it is done when the water stops spurting up), there is a bit more leeway when it comes to the stove-top version.
I recommend setting a timer for 7 minutes from when you add the percolator to the heat. This is a nice middle ground that should give you a strong but not overpowering brew. Remember that the longer you leave it, the stronger it will be. But given you should have started off the heating process slowly, you shouldn’t be at too much risk of over-brewing.
5. Remove the Grounds, Basket, and Central Tube
Once the percolation process is complete and your coffee has finished brewing, you’ll need to remove the inner sanctum of the percolator to access your freshly brewed coffee.
Be VERY careful as your device will be extremely hot!
Use a tea towel to lift the lid (move back to avoid the steam), and remove the thin central tube and the basket containing the coffee grounds. Place these on a plate or dish so the hot grounds and any residue do not cause a mess.
Then, close the lid back up and you’re ready to serve!
6. Serve!
Now you can enjoy a lovely rich, full-bodied coffee from one of the most underrated but effective brewing devices out there!
Do You Need a Coffee Percolator?

Whilst a coffee percolator is not an essential product for coffee lovers, it is definitely worth giving a try if you are used to drip brewed or french press coffee. Percolating coffee gives it somewhat of a richer, deeper flavor thanks to the repeat brewing process, effectively recycling freshly brewed coffee on itself.
Electric percolators are very convenient and actually are my preferred method. They are safer to use and easier to control, even if you do lose a bit of personalization of the coffee’s strength. What you lose in ultimate control you gain in consistency, so your choice of device will depend on which of these qualities you favor more.
Summary
Coffee percolators have fallen by the wayside in terms of popularity over the past couple of decades, overtaken by the simple french press and drip brew methods. However, these old-school devices are making a bit of a resurgence and the coffee world is all the better for it!
Regardless of whether you opt for a stove top or electric percolator, the method produces high-quality coffee that has a depth of flavor and richness that simply can’t be found anywhere else.
